Background:
Bell’s AH1 Cobra attack helicopter began its life in 1965 as the requirement for a faster and more powerful gunship type of helicopter was set by the US Army.
The AH1 Cobra arrived in 1967 and was put into immediate use in Vietnam and fulfilled a number of roles quickly gaining respect from friend and foe. The Cobra has seen many variants as the design has allowed the Cobra to be modernised as the battle field environment dictated.
The single engine Cobras soon developed into many twin engine versions in 1969 giving greater capacity over the battle field and seeing the Cobra beginning its service with the US Marine Corp.
Whilst the Apache has replaced the Cobra within the US Army’s inventory the later version of the Cobra still see wide usage with the US marines and a host of export nations. Some of the nations that have operated the Cobra over the years are Bahrain, Spain, Israel, Japan, Pakistan, South Korea, Turkey, Thailand, Jordan, Taiwan and Iran.
Many AH 1J twin engine cobras that possessed TOW missile capability were supplied to Iran when Iran was under the reign of the Shah. Post revolution Iran has seen an embargo on spares and support for their Cobra fleet being imposed by the USA and despite many Western analyst claiming that the fleet is grounded to a lack of spares, Iran has surprised the military world by not only being able to maintain and operate its Cobra Fleet but have also developed substantial equipment upgrades to further modernise their fleet of Cobras. This further proves the engineering soundness of the Cobra design which has also proven itself in armed conflict.
Building an Iranian Cobra:
As part of a challenge build amongst some friends, we had decided to build 48 scale Cobra helicopters. Initially the kit was to be any version of the Cobra produced by Italeri. I had seen pictures of Iran’s Cobras and decided that its desert colour scheme would be a nice change from the ever present green and gray schemes normally associated with Cobras. I purchased the AH 1T boxing believing at the time that that this was the same twin engine basic airframe that was utilised in the J version. How wrong that was, I was soon to find out.
Kit Bashing the fuselage:
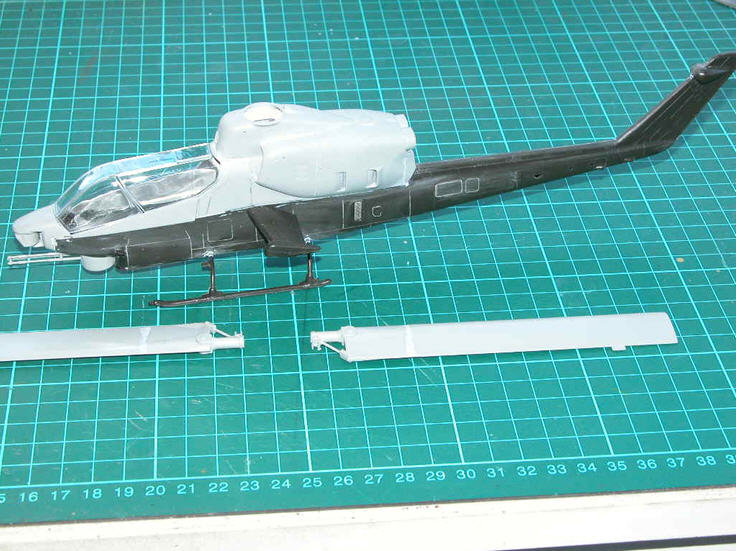
I was soon to realise that the J version could be described as a merger of the single engine airframe such as on the S version to the twin engine set up found on the T version. As no J version has been kitted in 48 scale the only way to build an Iranian Cobra was to kit bash one. This was going to require the purchase of a Monogram S version to provide the correct lower fuselage and tail boom.
The Italeri T kit surrendered up the engine pods, canopy and surrounding sills, the nose armament sighting pods as well as the Multi barrelled cannon and housing.
The Monogram S surrendered up the lower fuselage and tail boom, rotors, skids, cockpit and tow missiles and rocket pods.
Both kits had the raised panel lines removed and re-scribed prior to any surgery being performed. This included the wing stubs and tail plane.
In both cases, a fair bit of surgery was required to remove the unwanted parts. This was achieved by carefully scribing a line and performing repeated passed to cut off the various sections. Luck was on my side at this stage as the section widths of both manufacturers’ fuselages are the same thickness, thus eliminating a lot of work to remove an unsightly step.
It was at this stage of test fitting that I realised that the J versions canopy finishes where the rotor housing begins. The T version has a substantial insert of approx 300 MM on the real machine. This meant that I had to move the entire cockpit, sill sections and nose back by 5 MM on the model.
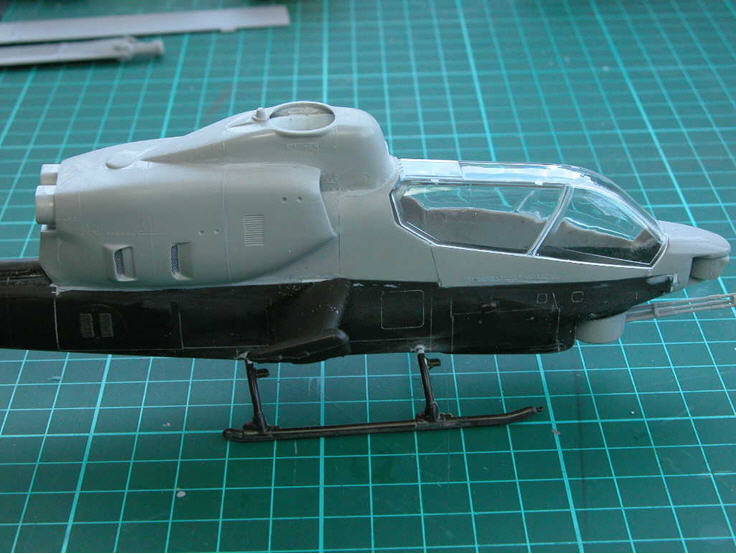
The entire panel in front of the engine intakes was carefully removed from the fuselage sides and a section of 5 mm in width was removed from the back section. The shortened panel was then place back into the fuselage side and fixed into place. This entire process had to be repeated on the other side with the dry fitting of the canopy happening numerous times. Fine wire mesh was installed behind the engine panel cooling ducts at this stage.
The fuselage shortened top sections were then mated to the lower sections. Join lines were filled using superglue and re-scribed after being sanded down.
Fuselage details which are not present on the Iranian J versions were removed at this point and included all radar warning receivers, hand grips, cockpit side armour and cable cutters
Cockpit tub:
The cockpit was the next step and the Monogram cockpit was chosen. Monogram produced many kits over the years that boast good cockpit detail, that really comes to life with careful painting and the Cobra cockpit is no exception. The seats have good moulded in seat belts, seat air conditioning ducts and a well detailed tow sight for the gunner. The cockpit required a new rear bulk head to fit the Italeri fuselage and careful trimming to allow the front of the cockpit to sit fully forward in the Italeri nose. This was fixed into place after painting and weathering of the cockpit. Extra stowage was placed at the back of the cockpit on the rear bulkhead as this area stores the first aid kit and other survival aids.
Extra detail that was scratch built and added to the cockpit were intercom cables, instrument panel wiring looms and various grip handles
Rotors:
The rotors were not spared from the scalpels touch as the rotors are unfortunately moulded in the wrong rotational direction by Italeri. The rotor blades were also modified to have square tips. The rotors were separated from the hub and reinstalled with brass pins for strength and at a higher angle of pitch than originally moulded. The tail rotor came from the Monogram kit and also required to be reworked to allow for the correct rotational direction.
Stub Wings:
The stub wings utilised were those from the Monogram kit which had its raised panel lines re-scribed. The centre weapons rack was from the Italeri kits as is represented the versions seen on Iranian Cobras. The Tow missiles from the Monogram kit boast excellent detail; and only required some minor wiring added and the ends of the tubes drilled out to give a more scale appearance.
Painting:
Now that the basic construction had been completed it was onto the painting stages. The colurs used wee referenced to the IPMS colour Reference Guide by DH Klaus. Gunze Sangyo acrylic paints were used to supply the basic colours and were
Gunze H-27, FS 20400, Tan Special
Gunze H-37, FS 30140, Brown
Gunze H-311, FS 36622, Dark Gull Gray.
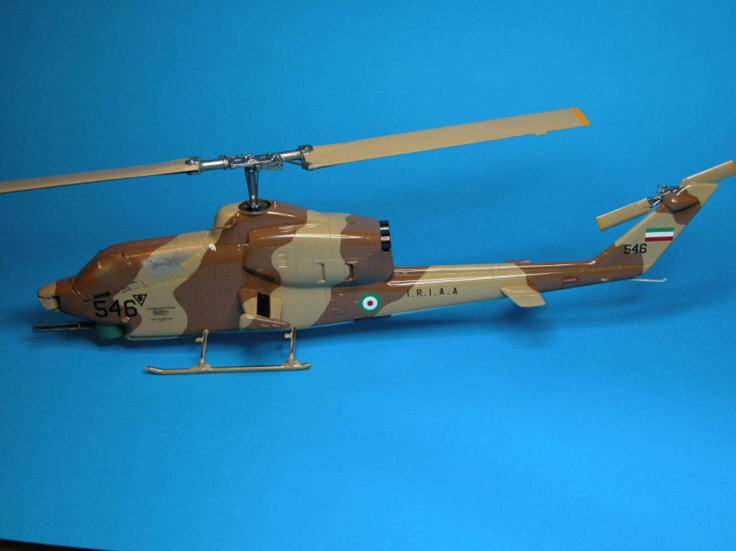
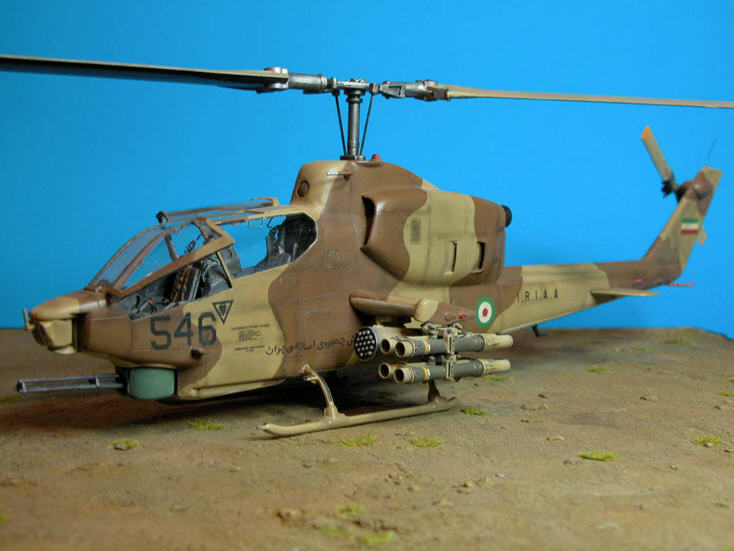
The gull gray was applied first to the undersides. Then the tan colour followed by the brown. All Demarcation lines were hard edged with homemade masks made from Tamiya tape. A coat of Johnson One-Go was applied to the model once all masks had been removed
Decals:
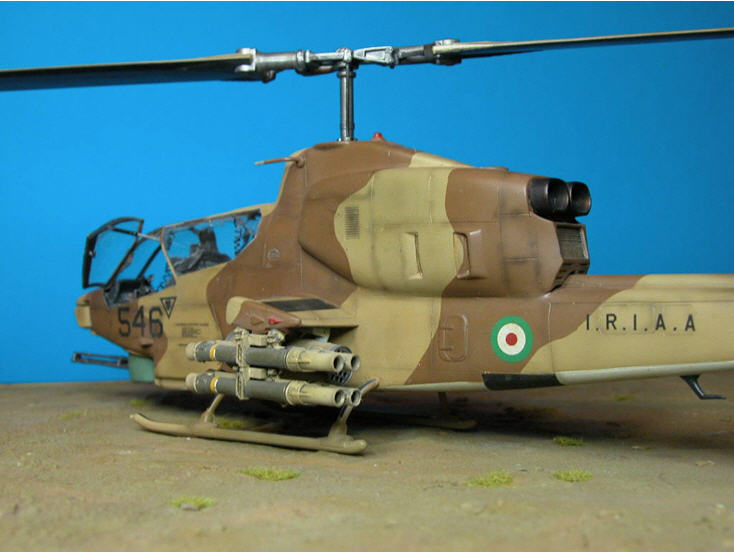
Decaling came next and most of the stencil decals came from both the two donor kits. The Iranian roundels came from a Phantom sheet with the tail flash being trimmed down to size. The number 546 came from the spares box and that then left me with the hardest part of decaling to do.
Iranian Cobras sport Arabic script on both sides of the fuselage. It appears to that the starboard side scrip differs from aircraft to aircraft but the port side scrip appears to be the same on all Cobras.
Using photos of the Arabic script, this was carefully copied on a sheet of A4 paper using a fine black felt pen. This was produced at approx 500% the size that was required on the model. The completed text was then scanned into a PC and reduced in size and printed as test shots onto paper. Once the exact size was obtained this was then printed onto clear decal film. Once dry this was sealed and allowed to dry. The Arabic script decals were then applied as per normal. Another coat of Johnsons One-Go was shot over the model at this stage.

A slightly lighter version of each colour was misted on to give a very slightly faded appearance that is representative of what was visible in photos. A Thin mix of red brown and black was then sprayed over the panel lines to give the model surface some depth as well as to represent slight weathering.
All of the various small parts such as antenna, rocket pods, tow missile packs were now installed.
The model was shot with a coat of Gunze Flat clear on the cobra was completed.
Conclusion:
Building an Iranian Cobra was very satisfying though a lot of work. It is a version of the Cobra that is not commercially available (except in 72 scale by Fujimi) and the colour scheme makes a nice change from other Cobra schemes generally seen.
One of the key challenges with building this kit was a lack of good photos of the AH1J cobras utilised by the Iranian forces.
The key aspect of our friendly challenge builds is to push the envelope and attempt something we would not normally do. The Iranian AH1J certainly achieved that for me.
I have also included a couple of images i drew and utilised to walk judges through the references I had put together to accompany my Cobra in competitions.

