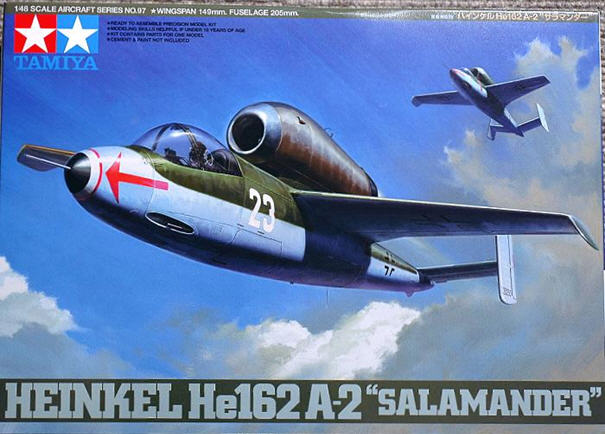
I was looking for a small kit to do a few things in the direction of natural metal / wood materials. I wanted to test a type of technical study, showing a model with no camouflage that only showed these materials. It could be anything. In a model shop I noticed the Tamiya’s He 162. I knew that at this late WWII machine from the many pieces of wood were used. Fits yes! “Even a good price, why not?”
A first look in the box, however, promised more work than I expected. First-pass samples yielded astonishing results in that the surface structures were of exceptional quality. A shake and bake kit! The parts should really go together almost by itself. A steel ball as a nose weight is included which is fitted later in the invisible parts of the inner hull. Great! “Perfectly engineered” in English one would say perhaps.
This is the stuff from which beautifully put together projects can be so long as long-term motivation is maintained and progress is rapid. In relation to the final appearance of things but should still take a very different turn. What had I actually found?
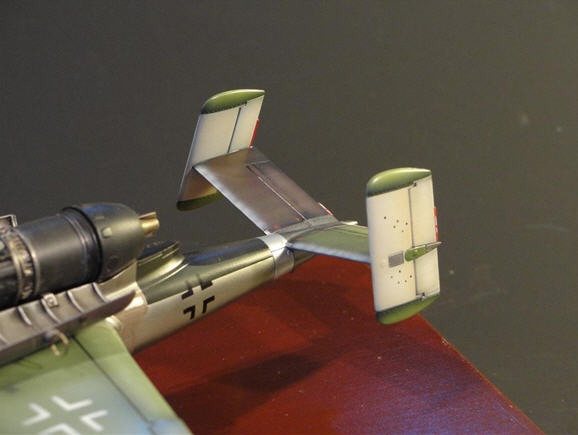
The Heinkel He 162 (also called folk or peoples hunter) was a German fighter plane of shoulder wing design. While the term may sound like it was designed to hunt people, in the actual German usage of the term, it translates to being a national effort in being built by the people. It was developed in a short time towards the end of World War II as part of the so-called “hunters emergency program. After the awarding of the contract to Heinkel, it was only 69 days later for the first flight at Vienna-Schwechat. Because the raw material situation was declining, the Third Reich pursued the use of wood as a substitute for metal, wherever possible. This also brought momentous problems and teething troubles with it, which resulted in the death of test pilot Peter Gotthold. Incorrectly glued wing components had been identified as a cause of accidents. The Sparrow as it was also known, had a speed limit of 600km/h imposed; this was 200km/h less than was being achieved as part of the testing.
The He-162 already had an ejectable cab roof plus ejection seat. The pilot would be able to eject in the event of failure of the BMW 003 jet engine or a material error. The armament consisted of 2x MG 151/20 with 120 rounds per caliber 20mm. The main application was to fight the Allied bomber streams over Germany. The He-162 had two unconfirmed victories in April and May 1945. Not more than a last and desperate attempt….
A huntsman and born of the ―Jägernotprogramm‖, or “fighter aircraft emergency building program. I like these “apocalyptic terms”. It has a morbid charm, but at the same
time they somehow capture the technologically forward-looking aspect of the programme. More and more I fell into the history of the aircraft and in the long evenings in front of the computer, I found a lot of information including specifications and detailed information about the materials used. I had photos of a very unique machine.
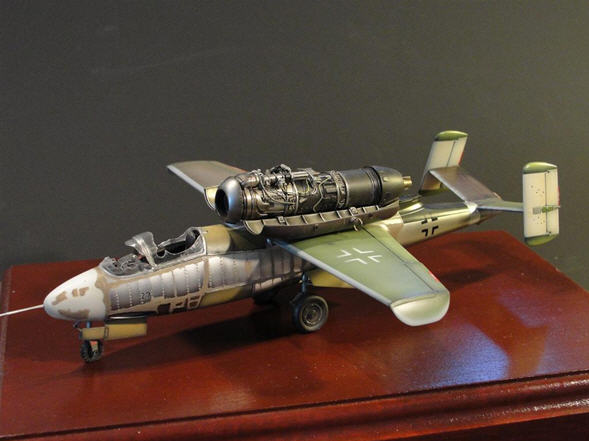
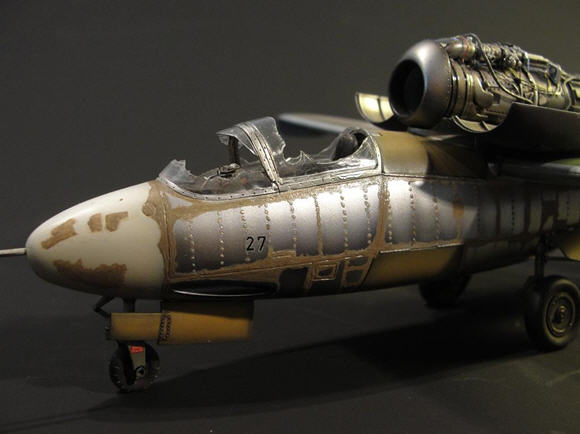
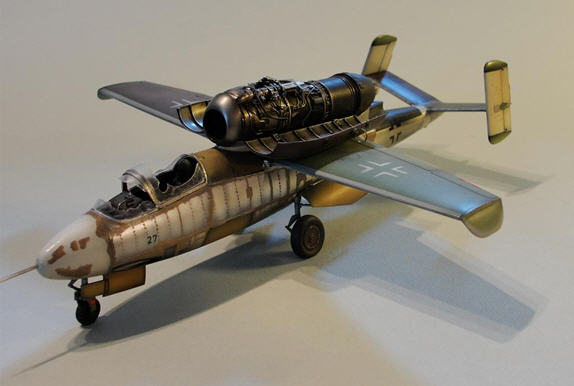
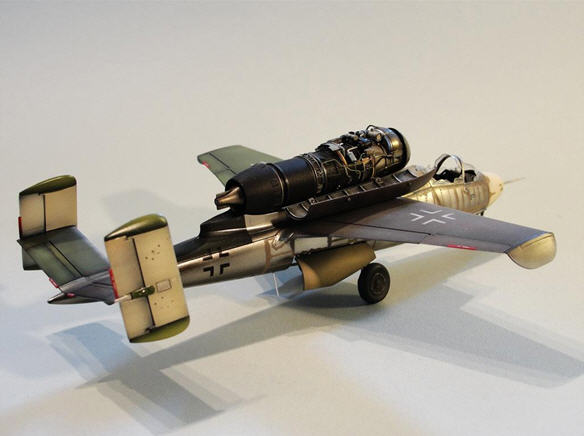
“Black 27” was found by the Americans in a non-flying condition at the site of the Junkers factory in Bernburg in April 1945. Partially destroyed and in an unfinished state, it had a broken front canopy. I found two pictures of this machine which was I was happy with considering how hard it can be to find pictures of such unique aircraft! That was the point at which things become more and more interesting

on this machine. An opportunity to add more detail. I had already started to build the kit but I ordered the available Eduard PE quite late so there were some internal parts I couldn‘t use. For the engine, however, they were just the right time.
Time for the engine! On the reference photos, the machine is stationary and the engine cowling open. This may be THE focal point for this project and therefore requires at this crucial point some special attention and care. The Eduard etched parts arrived and are best used at this stage.
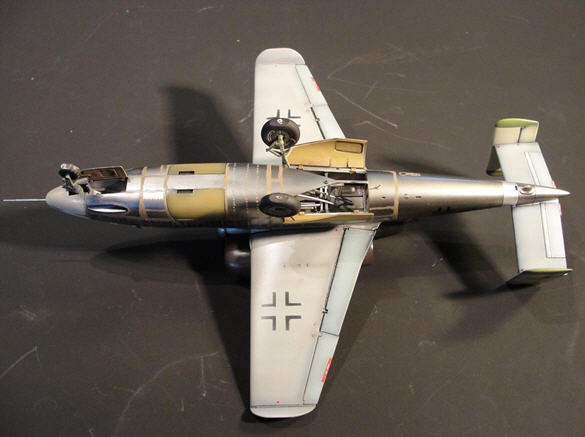
Now, the machine had already got her little cherry on the cake, without actually be ready. It was at this point I still no idea how I should actually achieve the look of the natural metal with filler. Well, I had a vague idea, but no concept. I thought if I take my time and just keep working on the project the right idea will come.
OK, now for some answers to some common modelling questions:
Why acrylic?
Dries quickly, allowing fast working, easy in combination with turpentine-based aging blends, filters.
What paint thinner do you use?
For acrylic paints from Tamiya and Gunze, only use the so-called “Lacquer Thinner and Gunze “Levelling Thinner. These produce thinner in my opinion, the best results. This should always be kept very thin. 70% colour and 30% thinner it gets interesting. For translucent layers of acrylic filters and inserts I use this ratio sometimes, vice versa. The Levelling Thinner dry slightly slower than the lacquer Thinners. This also facilitates softest spray images with borders with- out any speckles. A few drops of clear lacquer is not a secret recipe, and contribute to many good mixes. Always thin, more and more time to build layers of the paint. To work, you should really get used to this type because it is the key to the finest nuances and effects for a really impressive model.
Should you seal your Alcladcolours with sealant?
Indeed. With clear acrylic lacquer finish, do this slightly and carefully however. If you do the clear coat too wet and too thick on the surface, it destroys the pigmentation of the Alclad delicate colours on a black acrylic base. The best way is to veil two to three times lightly over the model with breaks of 10 minutes. Then you can carefully paint with a little more risk because we already have a protective layer. Be aware, the lustre may be lost and may look dull again.
If the seal is successfully applied to the surface, it shines again with a depth. Further, the natural metal is now stable and can be more intensively with decals and weathering. Not every Alcladcolour will tolerate protective coatings. Chrome e.g. does not always react positively to such tests. I strongly recommend to test first.

What airbrushes do you use?
I have three airbrushes. One is an old Revell Master Class professional. This is good for larger areas such as hulls of ships and the like. A HarderSteenbeck Infinity is the gun I use most. It is somewhat oversensitive in the air valve, but once you know how to deal with her she will reward you. It is very, very smooth and this is important for the comfort and a good feel for what you are doing. It provides a very fine spray pattern. Then there is the Iwata CM-B. This gun I enlist when it gets really hairy. Fine points with diffuse edges, thin lines, a delicate finish and the like are its particular strengths.
In the end you can‘t buy talent, dexterity and sense of colour for any amount of money. With airbrushes the result is not always proportional to the amount of spent. I personally would prefer to recommend visiting workshops at model exhibitions. Here you have the opportunity to learn by practical example as to exactly what works well. The money invested here is beneficial. Furthermore, one should also re- member at the time to use a practice model. I have several trunks of models as test objects that are constantly in use. AItaleri F-86 Sabre or a 1/32 RodenAlbatros as an example.

How important are the color codes, RLM, RAL, FS for you?
Honestly? Almost not at all.
More important is the knowledge of the color wheel. A basic knowledge of the historical aspect of course is not harmful. For example it may have be the case RLM 76 is light blue for example One should know generally what this color is, however, it is much more important how convincing our representation our colour is. It must be reasonable, logical and acceptable. When we mix the colour, we can lighten or darken it, or a little more blue. This then produces an acceptable colour, not necessarily the “right” RLM 76? What is more interesting and appealing for the viewer? The right mix of colours, or perhaps more of an appealing effect?
Maybe a light blue oil filter or something to bleach diluted gray?
Maybe even a little dust to buff? I personally believe that research pay off more quickly in that direction. Sure, a green RLM 76 is not particularly good. That makes no sense. A certain part of credibility should be already considered in the correct reproduction. But the slavish adherence to colour code is not reviewed by judges and most of the audience. Here, other qualities are required.
One of the major effects in this model from the original, is to represent the filler, which occurs clearly on the unpainted fuselage parts. I had a vague idea of how this was achieved. Of course, one way was to apply with a brush. I decided to have a “safety net” using a reversible method. Here, if an error happened in the finish, a slip, an unintended slip, it becomes difficult to correct with either acrylic or enamel again. Oil colours were therefore the paint of choice. On our sealed model with clear acrylic lacquer model, you can easily remove them if need be without trace. When choosing the colour I went with my gut feeling based on child-hood memories. In my memory, such fillers are often light brown to beige. Grey can also be a safe option. I chose beige. On my next project, I must continue to look for an improved and better-looking way to represent the filler. Perhaps apply the colour, wait a day and carefully wipe it….? Somehow you have to achieve a better look for this sanded effect.
In summary, I can say that this project was new territory for me andwasalotof fun. There are not many models of the He-162 on the internet, which are finished in this way. For the ambitious model builder it‘s a great opportunity. I was very surprised I was able to achieve a good effect on this model, I did not expect to. Maybe it’s just a good idea to develop the skills separately, ie for natural metal and paintwork in this case, and to combine them, the more unusual, the better. An original photo as a guide is always good.
The biggest problem I had was the canopy. Some experiments with the transparent injection-moulded part from the kit ended up in some meaningless fragments and thus in a disaster. As a precaution I purchased several packs of Vacu-moulded parts. I actually used three complete vacform canopies, plus the kit part until I had luck with the fourth vacform canopy. The problem with the hood is not the only reason I want to do this project again in 1/32. Perhaps you will be lucky if you try this project….?
Footnote about Alex Glass:
As with many current modellers, Alex Glass, from Germany, in his childhood had a strong interest in models, followed by a long pause. Even as a child, he built a wide range of kits, regardless of whether they were ships, space- craft, vehicle or aircraft.
After getting back into modelling again later, he continued these diverse interests. In principle, it motivates options in the finishing and display skills or the originality of a subject to start new subjects.
Alex is owner of the domain www.uschivdr.com and develops his own model building products such as the Uschi wood grain decals available from his website.