| Scale | 1/48 |
| Manufacturer | Tamiya |
| Modeller | Martin Reid |
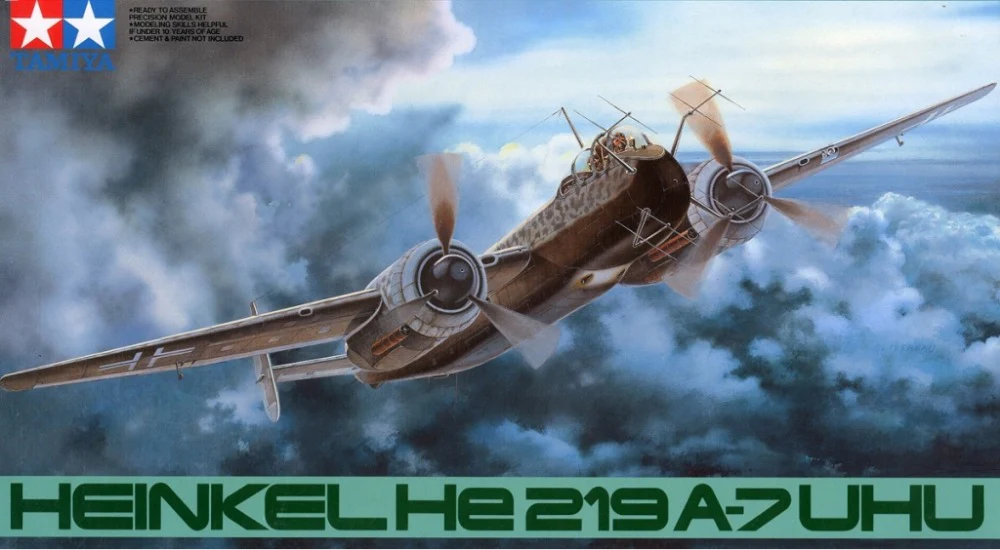
| Background | Released in 1997 I eagerly purchased this kit moving on the old MPM / HML resin multi-media kit that was nice but a lot of work. You also had the ongoing concern once built the heavy solid resin wings may droop over time! Fast forward to 2022 and the kit purchased in 1997 is still sitting in the stash untouched. With the then upcoming Gunna-Build nominations looming it seemed appropriate to finally get this kit underway. The He219 is one of my favourites, I love the design and while not perfect, it was a capable night-fighter and unlike most Luftwaffe creatures of the night, it wasn’t an adapted workhorse, or should that be work insect given it’s profile? (refer Pic 2) So, 25 years later I finally built my Uhu and was fortunate enough for it to place first in Gunna Build. Now to contemplate the 1/32 Zoukei-Mura version in the stash . . . |
| Comments & Conclusion | An enigma is described as “a person or thing that is mysterious or difficult to understand.” This can be aptly applied to Heinkel’s night fighter, the He219. It’s not until you build a subject that you realise, no matter how much you’ve learnt about it over the years, there’s so much you don’t know and still have to learn. Working through the build and various details, I came across a number of issues including how the canopy bracing wire actually attaches. I still can’t work out how that was without getting in the way of the crew! This is a nice kit but shows its age. A great representation is available out of box but attention to a few details can elevate its presence with a little effort. I found it needed filler in some areas as detailed later and while I admit I initially rushed progress, it’s clear to see that Tamiya have not rested on their laurels and continue to focus on the engineering of their kits to make each build as enjoyable for the modeler as possible. I do intend on doing another, there’s a lot of extra detail I could have added, I just hope it doesn’t take another 25 years to get around to it!!! |
| Aftermarket Items | Red Fox 3D decals for interior detail, Set No 48-094 Eduard etch seatbelts, Set No FE948 Eduard Canopy Masks, Set No EX161 Metallic Details etch set, MD4805, for hatches and wing grilles Master Details, AM48-027 – FuG220 Lichtenstein SN-2, turned brass radar set Model Kasten stretch-lycra filament for aerial wires |
| Decals | Third Group 48-023, Nachtjäger- Heinkel He 219A-7 Kit Decals NOTE: The Third Group sheet provide codes for NJG1 (G9) rather than NJG3 (D5), the kit sheet provides the NJG 3 code. Also, Third Group do provide the correct Werk Nr 310189 rather than the incorrect 380188 as supplied by Tamiya. This is substantiated by reference photos. |
| Paints Used | AK Real Colors for all camouflage and internal colours SMS Hyperchrome for the oleo struts Tamiya Acrylic Lacquer Clears Tamiya Panel Line Accent Colors for weathering |
| Modifications | Pitot tube scratch-built from brass tube and wire Main undercarriage doors struts scratch-built from brass tube and wire |
| Scheme | D5 + CL, 3./NJG3, May 1945, Denmark. Werk Nr. 310189 This particular machine was photographed predominantly after it had been liberated by the RAF and most German markings overpainted. As a result there is some doubt over the original markings however most information points to it being a machine of 3./NJG3 |
| Build Details | I had initially rushed construction so I don’t know if was me or the kit but I had a bit of filling, sanding and rescribing to do with the add-on panels on the upper and lower sections of the fuselage. The rear of the engine nacelles on the wings were particularly poor and a lot of time was spent correcting these areas. Make sure you do all your filling and sanding before you attach the wings to the fuselage. I didn’t and this cost me a lot of time and messing around, particularly rescribing lost panel lines. The Metallic Detail hatches and grilles are a great addition. I needed to slightly trim the port side wing larger grille to fit but being brass this was an easy task. All other components slotted into place but for the external hatches you need to give them a slight rolling to ensure they fit on the curved surface. The decal seatbelts were basic and out of character when the kit was first release so aftermarket belts are a must as the decals look almost drawn on, and not well drawn at that. There are some ejection in marks in the wheel-wells that need to be removed. I used Tamiya putty (grey) heavily thinned with Tamiya lacquer thinner. This applies easily and dries quickly with little to know shrinkage so a light rub down. With these areas covered, construction is relatively straight forward and unless you’re looking to heavily modify and or detail, the kit progresses without and major issues. There are a few areas of detail that are worth the effort such as (refer Pic 8) the bracing strut across the main undercarriage doors that has been missed in the kit. The connections points are moulded on the doors so it’s an easy addition with brass tube fit one and add that extra detail. Brass tube and ire also make a much more presentable pitot tube. The kit aerials are OK but a set of the amazing Master Details turned brass aerials were far more appealing. Constructing them has issues with strength and alignment. I made a jig to hold the aerials dipoles in place so I could glue them together with epoxy putty. (refer Pic 4) There are tiny support brackets that were then added with thin CA glue. Next time around I’ll solder the main components together. The epoxy is strong but the extra strength from solder would be worth the effort. I chose not to have the access ladder attached for two reasons. There are plenty of photos showing it’s not always down when parked and the primary reason was that if attached, you need to remove the panel and build the cavity and I was just too lazy to do that! I had an OCD moment when looking at the clear tail cone. There’s a landing light to paint in there, but no backend of the light or wiring so a little extra work in this end with stretched sprue and brass wire put the universe back in harmony for me . . . (refer Pic 5) |
| Paint & Finishing | The He219 is notorious for its complicated schemes on most airframes that’s quite a challenge to get right or at least looking acceptable. Typically, larger twin-engined Luftwaffe night fighters of the period would be finished in RLM76 White Blue underneath and RLM75 Grey Violet on top. RLM76 would then be applied over the top in an array of patterns to give the illusion of the airframe being overall RLM76 with RLM75 dots. Patches etc over the top. The He219 was no exception and in may cases it was a tight night, cross-hatching and weaving of RLM 76. After careful study of available reference photos I used my trusty Harder Steenbeck Infinity with 0.15 needle and painted in a tight variation of crosshatching, weaving and general randomness. I ended up with both of my Infinity airbrushes out at one point as I finalized the scheme, one with RLM 76 and the other with RLM75 and kept going over and over until I was comfortable with my representation. (refer Pic 6) Not immediately obvious and represented in the decals are the white spirals on the spinners that Claes Sundin showed in his profile in his book, Luftwaffe Night Fighters, Profile Book No 5, Profile no 91. Again, further close study of available photos convinced me they were present but rather than RLM75 mottling also, I interpreted this as dirt and grime. As always, I clear coated with Tamiya acrylic lacquers, I find them easy to use and their flat to my eye is just right, not dead matt but not too satin and some flats tend to be. I did find the Third Group decals to be problematic with their ability to adhere to even a gloss surface. I had need to do a few touch-ups and even de-tacked Tamiya tape that is normally safe to use lifted the decals. This caused a few stressful times but I was able to either use a replacement decal or at least not tear the decal so some more Gunze Mr Mark Setter applied settled them back down. For the aerial wires from cockpit to tail, I used the Model Kasten stretch lycra filament. I use this for my Wingnut Wings biplane rigging. Generally available from Hobbylink Japan, www.hlj.com, I’ve found it to be the best and (so far) after years of use remains stretchy and doesn’t degrade like others. Well worth seeking it out, it attaches easily with a drop of superglue. I chose to depict the Uhu as it would have been earlier in it’s career with some use but not looking like a “barn-find”. (refer Pic 7) I took a restrained approach with my use of Tamiya Panel Line Accents and some black and brown pigment powders around the exhausts and airframe in general. |
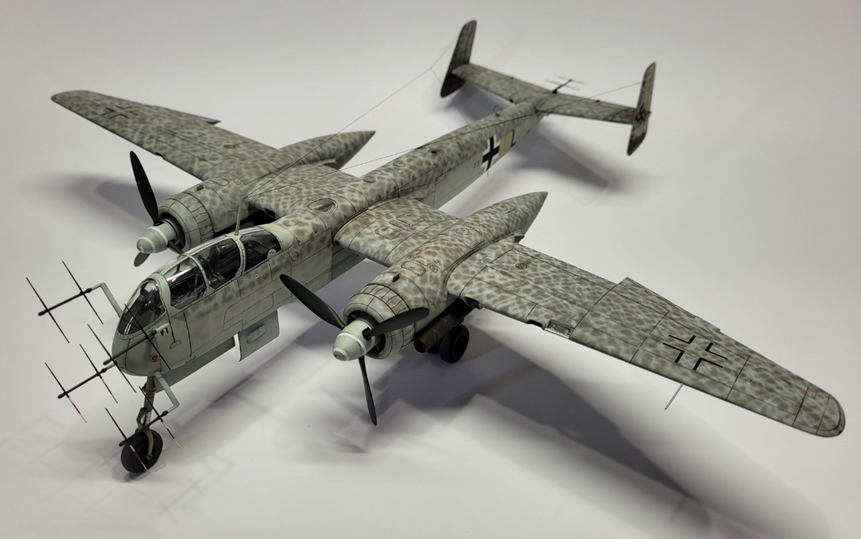
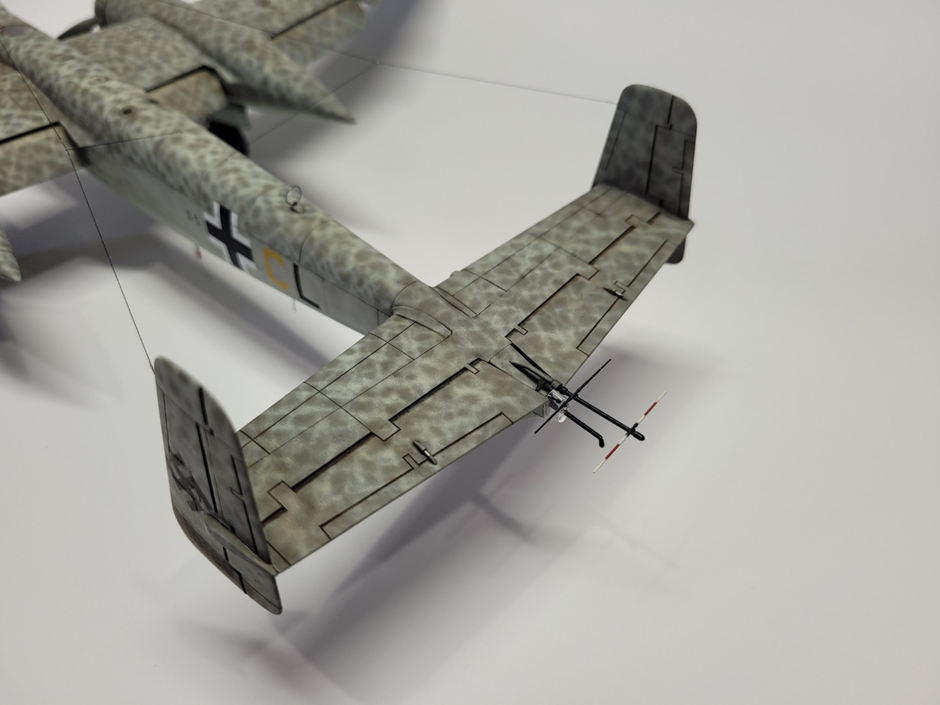
Pic 2 Caption: The Heinkel He219 A-7 cuts a menacing insect-like profile.

Pic 3 Caption: The business end of the He219 with FuG220 radar.
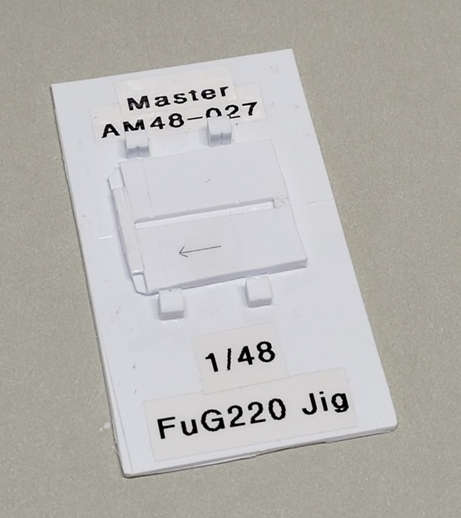
Pic 4 Caption: I made this jig from sheet styrene to assist with construction of the FuG220 radar.
Pic 5 Caption: Barely visible is the scratchbuilt rear light and wiring in the clear tail cone.
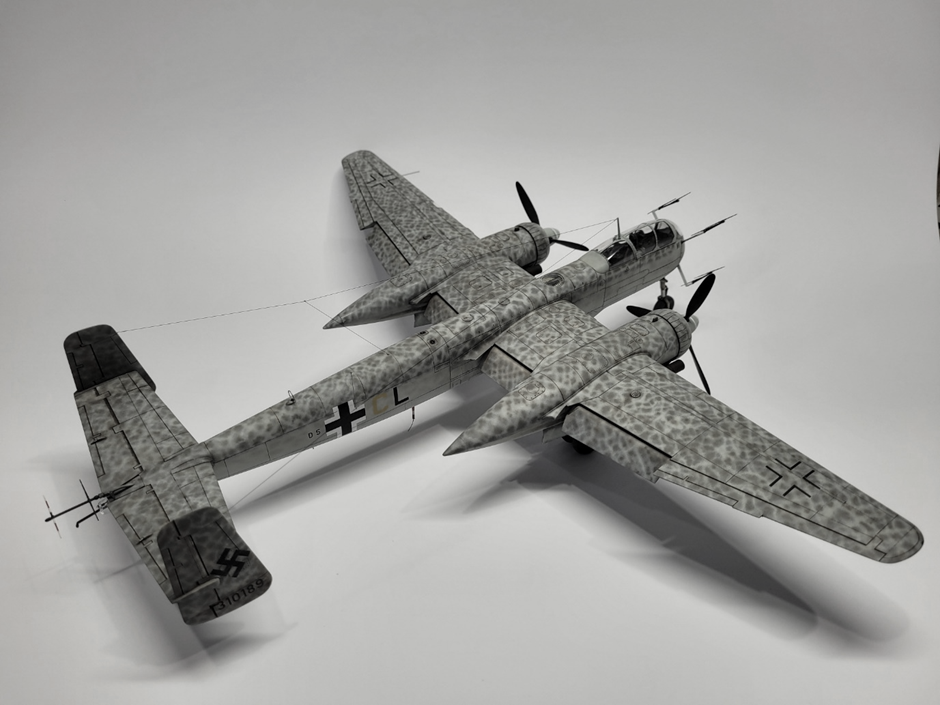
Pic 6 Caption: The complex spotted pattern from RLM76 White Blue sprayed over RLM 75 Gary Violet
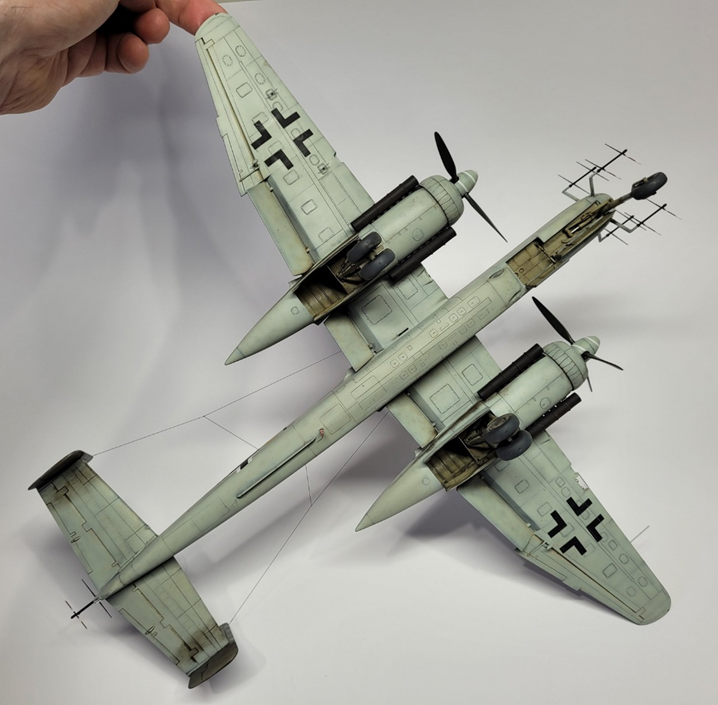
Pic 7 Caption: Weathering was kept to a minimum, I wanted it to look in service but not a barn find.
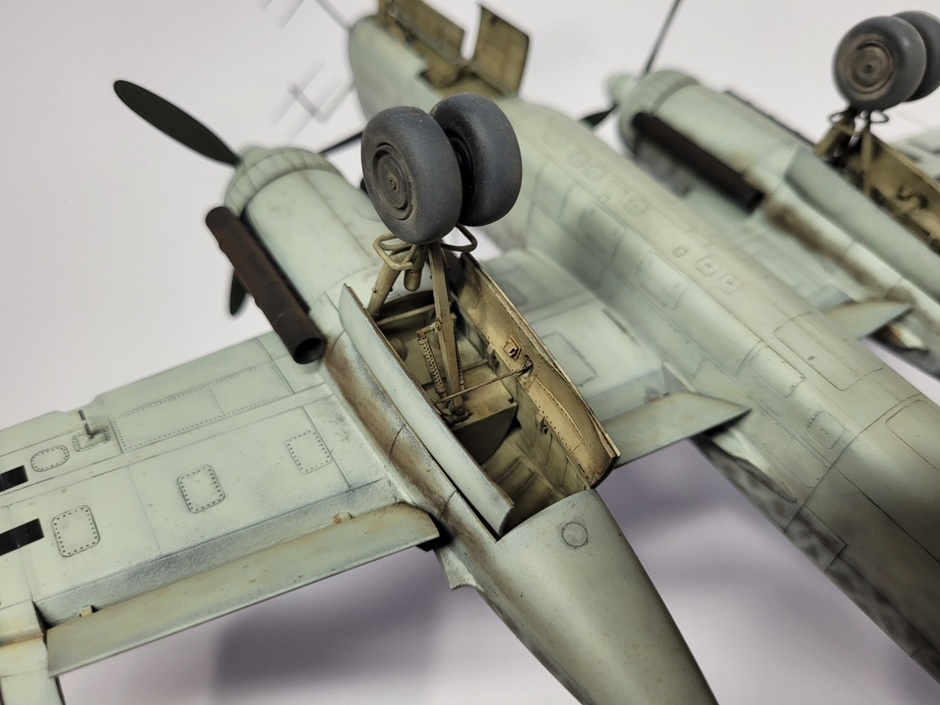
Pic 8 Caption: Undercarriage detail, note the main undercarriage door struts, a simple but effective detail add-on.
Michael Tabone
Club President